Continuous Delivery for the rest of us
Combining Continuous Integration and GitOps for Deployment in Multiple Environments

Getting the bigger picture
DevOps methodologies have now taken hold; the use of pipelines for code builds is a well-established practice adopted by any modern development team. But when we change the conversation from Integration to Deployment, I often find myself looking at extremely simplified examples, where newly built code is released into production with a single command at the end of the build and test stages. Which is, of course, the definition of Continuous Deployment. But in my daily work, I have learned that reality is rarely that simple.
If your team is super smart and has every possible test in place, and your business structure allows you to apply Continuous Deployment directly from commit to production, first of all, congratulations! Unfortunately, this is not the case everywhere: the rest of us often need to deploy our code in different environments at different moments in time (intervals of days, or weeks! 😰 I know, I know...), there are release windows to be met to release to production, and there are acceptance tests performed by other teams so the testing environment can only be updated at agreed-upon times, and a variety of other constraints, especially in large and very structured companies. Still, we don't want to give up the benefits of automation.
Automation, yes, I said it. But, how? When your artefacts need to be deployed in multiple environments, you can't just repeat the same process for each environment: you need to deploy the software without rebuilding it. This aligns with the "build once, deploy anywhere" principle, which states that once a release candidate for a software component has been created, it should not be altered in any way before it is deployed to production. And if you find yourself in the situation that I just described, with different timing for each environment, you can't just put your deployments in line and execute them one after another in the same pipeline execution.
I have come across various articles on the Web about GitOps, and while they can be useful, they focus on specific, isolated aspects of configuration, or they often oversimplify, leaving me feeling like I'm missing the bigger picture: which is, of course, the process.
In this article, I want to illustrate an approach that I successfully have applied in several projects, combining a classic Continuous Integration pipeline with the Continuous Deployment practices enabled by GitOps, so that the entire workflow goes directly from committing the application code to a Continuous Deployment in a development environment, also managing multiple Kubernetes environments where you can release your code at different moments in time. Or, as I like to call it: Continuous Delivery for the rest of us 🤓
A brief definition of GitOps
If you never heard of GitOps before, it is a way of implementing Continuous Deployment for cloud-native applications.
The term "GitOps" refers to the use of Git as a single source of truth for declarative infrastructure and application code in a continuous deployment workflow; it reflects the central role that Git plays in this approach to Continuous Deployment. By using Git as the foundation for their deployment process, teams can leverage the power and flexibility of Git to manage and deploy their applications and infrastructure in a reliable and scalable way.
In a GitOps workflow, developers commit code changes to a Git repository, and automated processes pull those changes and deploy them in a reliable and repeatable manner. This approach enables teams to deploy applications and infrastructure changes with confidence, as the entire deployment process is version controlled and auditable.
In the following I will explain the details of the various steps, starting from the end: it may seem counter-intuitive, but I have the feeling it may be more useful to start from the final goal and go backwards to "how to get there".
Argo CD: the GitOps tool
Argo CD is a Continuous Deployment tool for Kubernetes. It helps developers and operations teams automate the deployment of applications to Kubernetes clusters.
Here's how it works:
You define your application's desired state in a declarative configuration file, usually written in the Kubernetes resource manifest format (e.g., YAML).
You commit this configuration file to a Git repository, which serves as the source of truth for your application's desired state.
Argo CD monitors the Git repository for changes to the configuration file. When it detects a change, it synchronizes the desired state of the application with the actual state of the application in the cluster.
If the actual state of the application differs from the desired state, Argo CD will apply the necessary changes to bring the application back into alignment. This includes creating, updating, or deleting resources in the cluster as needed.
I will not cover the details of the Argo CD installation or configuration procedure here; you can easily find many guides on this.
In this discussion, I will use a configuration consisting of a single cluster, with Argo CD installed in a dedicated namespace, and three environments, develop, staging and production, installed in as many namespaces. Depending on your level of experience and the needs of your use case, your topology may vary.
Argo CD is itself configured via a dedicated Git repository and a pipeline that performs configuration synchronization. These configurations, specifically, include three very important pieces of information:
the repository containing the Kubernetes configurations
the directory within that repository (we'll learn more in the Kustomize chapter)
the repository branch or tag to use, which will be the only information to be updated when a release needs to be delivered in an environment (we'll learn more in the Release Captain chapter)
So for example, a configuration for develop environment (my environment is an "application" in Argo CD terms) can be like this:
apiVersion: argoproj.io/v1alpha1
kind: Application
metadata:
  name: develop
  namespace: argocd
spec:
  project: develop
  source:
    repoURL: https://git-codecommit.eu-west-1.amazonaws.com/v1/repos/mysupercoolk8srepository
    targetRevision: main
    path: develop
  destination:
    server: https://kubernetes.default.svc
    namespace: develop
  syncPolicy:
    automated:
      prune: true
      selfHeal: true
    syncOptions:
      - PrunePropagationPolicy=foreground
      - PruneLast=true
    retry:
      limit: 1
      backoff:
        duration: 5s
        factor: 2
        maxDuration: 3m
Here you can see the three pieces of information:
...
    repoURL: https://git-codecommit.eu-west-1.amazonaws.com/v1/repos/mysupercoolk8srepository
    targetRevision: main
    path: overlays/develop
...
targetRevision is, in my case, the main branch of the Kubernetes YAML files repository, where the integration pipeline of each microservice pushes its updated container image tag (corresponding to commit hash).
In my topology, for staging and production environments I have the very same configuration, except for targetRevision and path properties. These configurations are saved, as I mentioned, in a dedicated repository, with a corresponding very simple pipeline that runs kubectl -f apply to the cluster when a commit is made.
As for the develop environment, its configuration on ArgoCD will always point to the default branch (main in this case) used by the integration pipeline to update container image tags. In this way, a continuous deployment approach is used in this environment, as the new version of an image is updated as soon as it is available.
About the other environments, however, I explained before why I've decided to maintain a more conservative approach and make releases in a controlled manner, applying continuous delivery. Therefore, the configuration of these environments on ArgoCD will point to a specific tag applied to the commit on the default branch when an application version, as a whole, is considered ready to be promoted to the next environment (as we'll see in the Release Captain chapter).
So for example, the staging environment is configured as follows:
...
    repoURL: https://git-codecommit.eu-west-1.amazonaws.com/v1/repos/mysupercoolk8srepository
    targetRevision: release/2.7.0
    path: overlays/staging
...
and similarly for the production environment:
...
    repoURL: https://git-codecommit.eu-west-1.amazonaws.com/v1/repos/mysupercoolk8srepository
    targetRevision: release/2.6.3
    path: overlays/production
...
ArgoCD supports three types of information as
targetRevision: a tag, a branch, or a commit. Using the commit gives the greatest assurance of immutability; however, it becomes difficult to track releases, which is instead made easier by a release branch or tag. Both of these, however, are not immutable; so it is important for the team to be disciplined and respect the process, i.e., not make any changes to tags or release branches. At the end of the day, the choice is up to you and what's better for your team.
Kustomize: managing multiple environments without duplicating code
Kustomize is a tool that allows developers to customize and deploy their Kubernetes applications, creating customized versions of their applications by modifying and extending existing resources, without having to write new YAML files from scratch. This can be useful in a variety of scenarios, such as creating different environments (e.g. staging, production), or deploying the same application to different clusters with slight variations.
To use Kustomize, you create a base directory containing your Kubernetes resources and then create one or more overlays that contain the customizations you want to apply. Kustomize then merges the overlays with the base resources to generate the final, customized resources that can be deployed to your cluster. You can find more information about Kustomize logic and syntax here.
How is Kustomize configured in my use case? My filesystem structure for the Kubernetes files repository using Kustomize is:
.
|-- base
|   |-- microservice1
|   |   |-- deployment.yaml
|   |   |-- kustomization.yaml
|   |   `-- service.yaml
|   `-- microservice2
|       |-- deployment.yaml
|       |-- kustomization.yaml
|       `-- service.yaml
`-- overlays
    |-- develop
    |   |-- kustomization.yaml
    |   |-- microservice1
    |   |   `-- deployment.yaml
    |   `-- microservice2
    |       `-- deployment.yaml
    |-- production
    |   |-- kustomization.yaml
    |   |-- microservice1
    |   |   `-- deployment.yaml
    |   `-- microservice2
    |       `-- deployment.yaml
    `-- staging
        |-- kustomization.yaml
        |-- microservice1
        |   `-- deployment.yaml
        `-- microservice2
            `-- deployment.yaml
Let's say that I have a microservice2 deployment.yaml like this (some properties are hidden, just for brevity):
cat base/microservice2/deployment.yaml
---
apiVersion: apps/v1
kind: Deployment
metadata:
  labels:
    app: my-super-ms
  name: my-super-ms
spec:
  selector:
    matchLabels:
      app: my-super-ms
  replicas: 1
  template:
    metadata:
      labels:
        app: my-super-ms
    spec:
      containers:
        - name: 123456789012.dkr.ecr.eu-west-1.amazonaws.com/my-super-ms
          ports:
            - containerPort: 80
You can notice that I did not put any container image tag here. That's because it is a piece of information that will come from the build pipeline when an image is actually built.
To better understand this concept, let's see the corresponding kustomization.yaml file in the base directory:
cat base/microservice2/kustomization.yaml
---
apiVersion: kustomize.config.k8s.io/v1beta1
kind: Kustomization
commonLabels:
  app: my-super-ms
resources:
- service.yaml
- deployment.yaml
images:
- name: 123456789012.dkr.ecr.eu-west-1.amazonaws.com/my-super-ms
  newTag: 6ce74723
What are those last three lines? Well, those are the changes made by the build pipeline when a new container image is created (as we'll see in the next chapter). In the initial version of this file, when I created it, I didn't include them, but merely indicated which files inside the directory to consider. So this change is exactly what the build pipeline does as its last action.
What about the overlays? As I said before, a Kustomize overlay is a directory that contains customizations that you want to apply to your Kubernetes resources. It is called an "overlay" because it is layered on top of a base directory containing your base resources.
An overlay directory typically contains one or more Kubernetes resource files, as well as a Kustomization file. The resource files in the overlay directory contain the customizations that you want to apply to your resources, such as changing the number of replicas for a deployment, adding a label to a pod, or maybe having different ConfigMap contents because some parameters differ among environments. The Kustomization file is a configuration file that specifies how the customizations in the overlay should be applied to the base resources.
Let's see a simple example: as seen before I've set a replicas: 1 spec in my deployment.yaml, but let's say I want to change this property in the staging environment to test HA.
My overlay configuration will be like this:
cat overlays/staging/microservice2/deployment.yaml
---
apiVersion: apps/v1
kind: Deployment
metadata:
  labels:
    app: my-super-ms
  name: my-super-ms
spec:
  replicas: 3
That's it, this is my complete file: I don't need to replicate my entire Deployment. I just put different values to the parameters I'd like to change.
What about my overlay Kustomize file? It just needs to know which files have to be merged. In my case it looks like this:
cat overlays/staging/kustomization.yaml
---
apiVersion: kustomize.config.k8s.io/v1beta1
kind: Kustomization

namespace: staging

bases:
  - ../../base/microservice1
  - ../../base/microservice2

patchesStrategicMerge:
  - microservice1/deployment.yaml
  - microservice2/deployment.yaml
For this YAML code, a pipeline is perhaps not strictly necessary for the process to work, but I recommend that one should be provided.
Specifically, a pipeline should be run every time a pull request is opened, and it should check the code for errors and security bugs; you can use tools such as Checkov or similar.
In fact, in this case, the default branch should be "armoured" and no one should push directly to it, except the build pipeline. A developer who intends to make additions or changes to Kubernetes files should commit them to a temporary branch (NOT a release branch) and open a pull request, triggering the pipeline execution, which, in the end, can accept the pull request and merge the code, thus making it immediately available to the develop environment (which, remember, is configured via Argo CD to be constantly aligned to the default branch).
The build pipeline in my opinion can instead write its changes directly to the main branch since the only detail it is going to change is the container image tag and there is no point in performing checks on Kubernetes files with such changes.
Building bridges
Going backwards, we finally arrived at the starting point: the build pipeline. As I said before, I will not address here what a Continuous Integration pipeline is - there are plenty of examples and explanations on the Web, and I assume that, if you've got so far, you probably already know it. For our process, what matters is that this pipeline, after pushing the new container image to the registry, performs an update on the Kubernetes file repository to communicate the new tag.
Although I used AWS in my design to illustrate this approach, the process is usable with any CI/CD platform and wherever Kubernetes is hosted. I used this approach in different projects, with AWS Code Suite and EKS as well as Gitlab or Bitbucket and Rancher; technicalities don't matter, what really matters is applying a structured process, whatever software products you choose to use and constraints you happen to have.
In my example, using CodeBuild as executor and CodeCommit as a repository, this last stage is run by this buildspec.yaml:
version: 0.2

env:
  git-credential-helper: yes

phases:
  pre_build:
    commands:
      - TAG=`echo $CODEBUILD_RESOLVED_SOURCE_VERSION | head -c 8`
      - REPOSITORY_URI=$AWS_ACCOUNT_ID.dkr.ecr.$AWS_DEFAULT_REGION.amazonaws.com/$IMAGE_REPO_NAME:$TAG

  build:
    commands:
      - cd $CODEBUILD_SRC_DIR_k8s_repo
      - cd base/$IMAGE_REPO_NAME
      - kustomize edit set image $REPOSITORY_URI
      - git config --global user.email "noreply@codebuild.codepipeline"
      - git config --global user.name "CodeBuild"
      - git commit -am "updated image $IMAGE_REPO_NAME with tag $TAG"
      - git push origin HEAD:main
I want to emphasize that the update of the image tag is done in the base directory of the Kubernetes repository, and not in the overlays: the management of different versions of the application in different environments is done with release branches, as we see in the next chapter. The overlays are only meant to allow for small differences in configurations, not versions.
To summarize, the whole process works as follows:
A developer makes changes to an application and pushes a new version of the software to a Git repository.
A continuous integration pipeline is triggered, which results in a new container image being saved to a registry.
The last step of the integration pipeline changes the Kubernetes manifests hosted in a dedicated Git repository, automatically updating the specific image with the newly created tag.
ArgoCD constantly compares the application state with the current state of the Kubernetes cluster. Then, it applies the necessary changes to the cluster configuration; Kubernetes uses its controllers to reconcile the changes required to the cluster resources until the desired configuration is reached.
All this works seamlessly in the development environment. But how do you make delivery in environments that need to be updated at different times? This is where the important role of the Release Captain comes in.
The Release Captain👩✈️: coordinating releases
A so-called "Release Captain" is a role within a software development team that is responsible for coordinating the release of code from develop to production (and every other environment in between).
In teams capable of doing Continuous Deployment directly to production, this role is played entirely by one or more pipelines that execute extensive tests, automatically open and approve merge requests, and tag commits properly.
Ideally, every team member should be able to act as a Release Captain on a rotating basis. What is the task of the Release Captain within our GitOps process? It is a relevant task, but fortunately not too onerous.
Let's say that, up to a certain point, development has been focused on the develop environment. At some point, a release in the staging environment must finally be established and scheduled. This is where the release captain comes in: he assigns a release number and tags the commit in the Kubernetes file repository default branch. Once this tag is created, the release captain will modify the configuration of the staging environment in the Argo CD repository, changing targetRevision by replacing its previous value with the new tag. Once this change is pushed, the triggered pipeline will execute the configuration change directly to Argo CD, which, in turn, will synchronize with the contents of the new tag, effectively deploying the new release.
This approach treats microservice applications as a single block to be released all at once in a given release. This may seem superfluous in many circumstances, especially if there are only a few microservices, but, in my opinion, it is important for two reasons:
if acceptance testing is done on a given release, you are assured of passing to production exactly the same versions of all microservices that have been certified as inter-working. In other words, if I have certified that microservice A in version 1.2.3 works with microservice B in version 4.5.6, at the time of promotion to the next environment I need to be sure that I release exactly the same versions together;
a thing is often underestimated from a development point of view but very problematic from an operation point of view: the rollback process. In case of problems, rolling back to the previous version, and returning
targetRevisionto the previous value, is extremely quick and safe and saves a lot of headaches.
That's it! For each release in the staging environment, simply repeat this process. For releases in the production environment, it is even simpler: once a release has been tested and judged suitable for deployment to production, there is no tag to be created: you use the same tag that has already been tested, and the only action to take is to edit the production environment configuration file in the Argo CD repository.
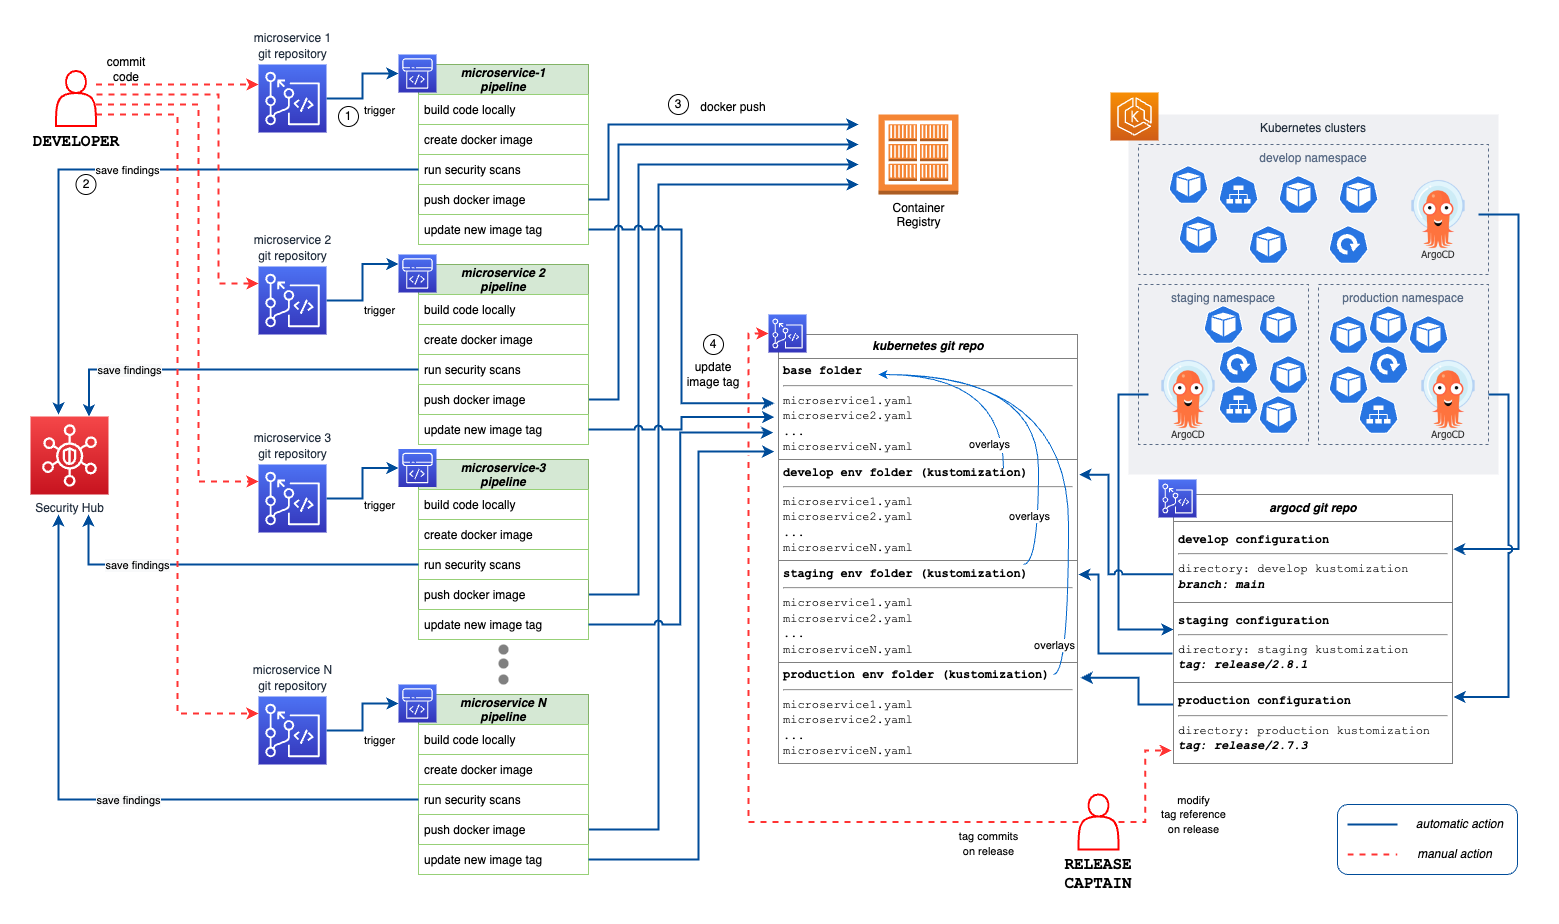
The following drawing summarizes the entire workflow, starting from the push of application code and ending with deployment to the various environments in the Kubernetes cluster.
Several aspects of this process can be slightly modified to meet the needs of the team; however, I have found it effective in even different situations, especially, as I mentioned, for projects within large companies that have constraints and yet do not want to give up the benefits of automation.