Photo by Nikola Jovanovic on Unsplash
Push the Green Button: Creating Event Gadgets with IoT and Serverless Architecture
Preparing for the AWS Summit Milano 2023 not only as an AWS Community Builder but as a representative of my company (sponsor of the event), I found myself grappling with an issue that seems small but is indeed profound - the ubiquitous, forgettable, and somewhat outdated practice of corporate giveaways.
Instead of contributing to the mountain of corporate freebies that usually end up in a drawer somewhere, I wondered, why not leverage my tech know-how for something more meaningful and sustainable? Thus was born the idea to create a simple but compelling swag: a unique, sustainable memento, in the form of a tree planted for our visitors. 🌱
Greening the Gadget: An Unconventional Approach to Event Giveaways
TL;DR: This chapter details my journey to develop an idea for an eco-friendly gadget for the AWS Summit. The project involves creating a physical button that, when pressed, starts a process to plant a tree through Tree-nation, yielding a unique URL for each tree. This URL is then transformed into a QR code through AWS Lambda, giving me a tangible, scannable memento that participants can take home and redeem at their convenience. If you're primarily interested in the technical side of this endeavor, feel free to skip ahead to the next section.
Tree-gifting Made Easy
As I explored potential platforms for my project, I found many that offered the opportunity to fund reforestation efforts across the globe. Some even had options for gifting trees - a sweet gesture, isn't it? But here's where the challenge arose: nearly all required prior registration of the gift recipient, complete with name and email address.
This didn't quite fit the vision I had. I wanted the process to be swift, convenient and not involve me handling personal data or permissions. Who wants to fill out forms in a crowded event?
Luckily, I found Tree-nation. Not only do they have a well-documented API platform to interact with, but they also offer the option to gift trees 'anonymously'. This meant that I could buy a tree as a gift and provide my user a URL; the user could then independently redeem their tree. No exchange of personal information and no long sign-ups at my booth during the event.
Now, having a URL for each tree was handy, but the challenge was: how to efficiently share these URLs at an event? The obvious answer is a QR code, printed and handed out to the user, so that it would serve as the physical gadget from the event. An eco-friendly token of their contribution to the greener cause, that they could hold in their hands, take home, and scan whenever they chose. No need to scan it right then and there, no strings attached. They could redeem their tree whenever they were ready.
Turning a URL into a QR code seemed like a task tailor-made for an AWS Lambda function. So, armed with the plan to use QR codes and AWS Lambda, the user journey was starting to shape up quite nicely.
Button Chronicles: Swapping Digital for the Real Deal
With the destination locked in thanks to Tree-nation, it was time to figure out the journey. The original plan? A virtual button on a web page or app, ready to be displayed on a tablet at the AWS Summit. With just a tap from a visitor, the tree-planting process would be set in motion. I quickly started sketching out a prototype to bring this concept to life.
However, as the prototype took shape, I realized it wasn't hitting the mark. It was essentially a webpage interacting with an API, which felt a tad ordinary. I was looking for something with a bit more spark, a little more 'wow' factor, or at least more unusual.
So, the virtual button was out, and a real, physical button took its place in my idea. It felt risky as I hadn't ventured into programming an electronic board before. But it was a thrilling challenge and an opportunity to break new ground. Anyway, this switch wasn't just about making the project more exciting; it was about adding a tangible touch to the user experience, and giving the project an original edge.
Pressing Forward: The Button and Code Considerations
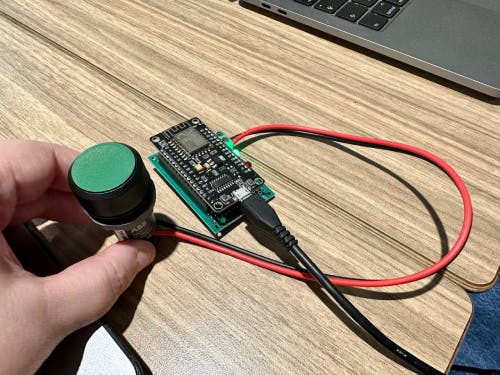
Navigating through my idea, I immediately liked an ABB normally-open push button that belonged to my household. To connect this button to the digital world, I opted for an ESP8266 electronic board and used Arduino IDE as the development platform to create and flash the necessary code.

From an architectural perspective, I ventured down several paths before finding the best solution for my specific use case:
Simplified Approach with Hardcoded Credentials: The original blueprint of my project was pretty straightforward. I created an AWS Lambda function directly exposed to the Internet, acting as an endpoint for a simple HTTPS request.
In this initial "No-Auth" setup, a user/password combination was directly verified by the Lambda code. AWS API Gateway was also considered in this scenario, since it could serve as a robust and secure front door to manage the Lambda function. However, it seemed like an overkill for a single-function project of this nature, pushing me to consider a more streamlined approach.
IAM-Authenticated Approach: I then evaluated an approach that hinged on AWS IAM to authenticate requests. This would ensure robust security but would also add a layer of complexity to the solution.
Whether directly invoking the AWS Lambda function or sending a message to an Amazon SQS queue, the device would need to include a Sigv4 signature in its request. This signature, generated using an Access Key and Secret Key combination, would be verified by AWS before proceeding with the request.
While this approach certainly enhanced security, it did not come without drawbacks. Notably, the time taken to verify the Sigv4 signature significantly affected performance. The authentication process alone took around 10 seconds, and when adding the 2-second execution time of the Lambda function, the total operation time ballooned to 12 seconds. Given this drawback, I moved on to explore another option.
AWS IoT Core: Given that my system was physical, I turned to AWS IoT Core. Devices registered on IoT Core have the native ability to communicate through queues with MQTT protocol (both publish and subscribe) and HTTPS (publish only). This interaction occurs through SSL certificates signed by AWS and installed on the device. Initially, I thought the MQTT protocol wasn't suitable for my use case because it required a constantly open connection. My button was a one-shot device and thus HTTPS seemed more appropriate. However, after rewriting the code, I found that inserting a message into the queue took around 7 seconds, which was better than before, but not exactly impressive.
MQTT with open connection: Finally, I wrote another version of the code, which established an MQTT connection authenticated through certificates at device startup and kept it open. With this approach, sending a message at the button press was almost instantaneous! This was a significant improvement. The execution time for Lambda remained the same (2 seconds), but with a better authentication system.
After weighing the pros and cons, I settled on the MQTT solution. Some might argue that a button should not maintain an open connection, as it would be more suitable for devices sending continuous sensor data. However, for my particular use case, I deemed it an acceptable compromise. As for the HTTPS solutions, while I could have implemented better systems (JWT or other types of authentication), I found it out of scope for my project and wanted to use something readily available, such as IAM or SSL certificates.
In light of the performance measured, I chose the compromise that seemed most acceptable to me. This doesn't mean it will work for everyone. I would always recommend considering your specific use case and determining what would work best for your situation.
For a visitor to physically take away a token of their participation, the project needed to incorporate a mechanism to create a physical output. This requirement introduced a printer into the mix. More specifically, a printer that could generate QR codes linked to the newly planted trees. To orchestrate this, I decided to leverage AWS IoT again, by registering a label printer as a device and using the AWS IoT Jobs service to send print requests as needed. Thus, the final step of our Lambda function involves the creation of an AWS IoT Job that instructs the printer to print the respective QR code.

The Green Code Deep Dive
Unrolling the AWS infrastructure
To manage the AWS infrastructure, I opted for AWS Cloud Development Kit (AWS CDK) in Python. You can find the complete solution on my Github repo.
I started by creating an Internet of Things (IoT) thing, which is a representation of a specific device or logical entity. In this case, it represents the button in my system.
Next, I generate a certificate signing request (CSR) for my IoT thing, used to request a device certificate. This certificate allows the device to connect to AWS IoT. To manage permissions, I create an IoT policy and attach it to my IoT thing.
After creating the virtual resource on AWS, I can download the SSL certificate that AWS generated for you through the CSR I provided.
Diving into the Device Code: AWS IoT Connectivity with ESP8266
Next, we move on to the C++ code written for the ESP8266 board. I started by creating a Secrets.h file where I inserted the certificate we just downloaded, the corresponding private key (created by CDK), and AWS's root CA (download it here):
#include <pgmspace.h>

#define SECRET

const char WIFI_SSID[] = "XXXXXXXXX";
const char WIFI_PASSWORD[] = "YYYYYYYYY";

#define THINGNAME "button"

const char MQTT_HOST[] = "abcdefghijkl-ats.iot.eu-west-1.amazonaws.com";

// Amazon Root CA 1
static const char cacert[] PROGMEM = R"EOF(
-----BEGIN CERTIFICATE-----
...
-----END CERTIFICATE-----
)EOF";

// Device Certificate
static const char client_cert[] PROGMEM = R"KEY(
-----BEGIN CERTIFICATE-----
...
-----END CERTIFICATE-----
)KEY";

// Device Private Key
static const char privkey[] PROGMEM = R"KEY(
-----BEGIN PRIVATE KEY-----
...
-----END PRIVATE KEY-----
)KEY";
The MQTT_HOST value can be retrieved by executing aws iot describe-endpoint --endpoint-type iot:Data-ATS in the AWS CLI.
Several key functions that power the IoT button application are included in the .ino file that I flash on my device:
The setup() Function: this function is called once at the beginning when the device is powered up:
 void setup()
 {
   Serial.begin(115200);
   pinMode(BUTTON_PIN, INPUT_PULLUP);
   connectAWS();
 }
The function begins by setting up the serial communication for debugging purposes and configuring the button's input pin (corresponding to the physical pin on the device where the button is wired). Then, it invokes the
connectAWS()function.The connectAWS() Function: this function is responsible for establishing a connection to the AWS IoT Core service:
 void connectAWS()
 {
   WiFi.mode(WIFI_STA);
   WiFi.begin(WIFI_SSID, WIFI_PASSWORD);
   //... Connecting to WiFi ...
   NTPConnect();

   net.setTrustAnchors(&cert);
   net.setClientRSACert(&client_crt, &key);

   client.setServer(MQTT_HOST, 8883);
   client.setCallback(messageReceived);

   reconnectAWS();
 }
This function connects the ESP8266 to the WiFi network, sets the device's time, sets the trust anchors and client certificates to the secure WiFi client
netand the MQTT server host and port to the MQTT clientclient.The reconnectAWS() Function: as the name suggests, this function is used to connect to the AWS IoT Core service:
 reconnectAWS()
 {
   while (!client.connected())
   {
     if (client.connect(THINGNAME))
     {
       client.subscribe(AWS_IOT_SUBSCRIBE_TOPIC);
     }
     else
     {
       delay(5000);
     }
   }
 }
This function keeps trying to reconnect to the AWS IoT Core service as long as the client is not connected. If the connection is successful, it subscribes to the MQTT topic defined by
AWS_IOT_SUBSCRIBE_TOPIC(this serves as the first "connection" with the platform, even if we are not waiting for any messages). If the connection is not successful, the function waits for 5 seconds before retrying the connection.The loop() Function: The
loop()function runs in a loop after thesetup()function completes:void loop() { if (!client.connected()) { reconnectAWS(); } // ... button reading and debouncing code ... if (button_state == LOW) { if (!message_sent) { publishMessage(); message_sent = true; } } else { message_sent = false; } client.loop(); }In this function, I first check if the device is still connected to AWS IoT Core. If not, it tries to reconnect using the
reconnectAWS()function. After that, it checks the button's state. If the button is pressed (indicated by a state of LOW), a message is published to AWS IoT Core if it hasn't been sent already. This message sending is guarded by themessage_sentvariable to ensure that only one message is sent per button press. After the button is released,message_sentis reset to false, enabling the next button press to send a message. Lastly,client.loop()is called to allow the MQTT client to maintain its connection to the server.
Lambda in the middle
The workhorse, responsible for executing my project's logic, is an AWS Lambda function that sends a request to the Tree-nation API to plant a tree. The request includes the Tree-nation planter_id (which is the ID associated with the Tree-nation account, provided by Tree-nation's support team. This, along with the token obtained from Tree-nation and stored as an SSM parameter, is used to authenticate API requests) and the selected species_id (a list of tree species that the user wishes to plant. During each operation, one species is randomly selected. I've selected several species from the Tree-nation catalogue, so this is a list of IDs from their platform). If the request is not successful, the function retries after a brief wait.
payload = json.dumps({
    "recipients": [{"internal_id": imageid}],
    "planter_id": planter_id,
    "species_id": project,
    "quantity": 1
})
headers = {'Content-Type': 'application/json', 'Authorization': 'Bearer ' + token}
response = requests.request("POST", url, headers=headers, data=payload)
Upon receiving a successful response from Tree-nation, the function generates a QR code that links to the newly planted tree's page on the Tree-nation website.
collect_url = json.loads(response.text)['trees'][0]['collect_url']
input_data = collect_url
qr = qrcode.QRCode(version=1, box_size=10, border=2)
qr.add_data(input_data)
qr.make(fit=True)
img = qr.make_image(fill='black', back_color='white')
The generated QR code is then saved as an image in an Amazon S3 bucket. Additionally, the function stores the image's S3 URL in a DynamoDB table for future reference.
s3.Bucket(bucket).upload_file(filepath, imageid + ".png")
table.put_item(
    Item={
        'ID': imageid,
        'treenation_id': treenation_id,
        'payment_id': payment_id,
        'timestamp': timestamp,
        'URL': "https://" + bucket + ".s3.amazonaws.com/" + imageid + ".png"
    }
)
Lastly, the function creates an AWS IoT Job that sends a command to the registered printer device. For this purpose, a job template provided by AWS is used, which runs a command — in this case, a shell script hosted on the device with a parameter value corresponding to the S3 URL of the image to print.
iot.create_job(
    jobId='RunCommand-' + imageid,
    targets=[target],
    jobTemplateArn='arn:aws:iot:' + region + '::jobtemplate/AWS-Run-Command:1.0',
    documentParameters={
        'command': "/opt/print.sh,s3://" + bucket + "/" + imageid + ".png"
    }
)
Printing the QR Code automatically
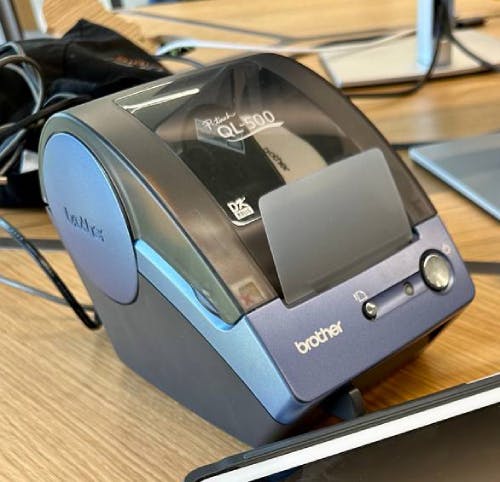
The final step in our process is the physical output, the printed QR code that we hand to our event attendee. For this task, I had a Brother QL-500 label printer borrowed from the available equipment at the company. There's an open-source Python library on Github, brother_ql, that makes interacting with this printer incredibly straightforward from a Linux command line.

My interaction device was an old Raspberry Pi 2 equipped with a Wi-fi dongle. As for the connection between the Raspberry Pi and the Brother QL-500 label printer, I established it using a standard USB cable. The fact that the brother_ql library enables easy command line usage made the Raspberry Pi a perfect choice for this setup. This allowed the device to receive AWS IoT Jobs, process the commands, and consequently interact with the printer to produce the QR code labels.

I used the AWS CDK again to create the necessary resources on AWS IoT. The setup for this process was very similar to the one I performed for the button. I saved the SSL certificates onto the Raspberry Pi to make them available for the device's connection with AWS IoT.
To receive commands from AWS IoT and translate them into actions performed by the printer, the Raspberry Pi uses the aws-iot-device-client, which I downloaded and installed on it. You can follow these instructions to do the same.
This installation includes a service in systemd that allows your device to start communicating with AWS IoT automatically whenever it boots up.
The configuration file /etc/.aws-iot-device-client/aws-iot-device-client.conf sets up the connection between the Raspberry Pi device and the AWS IoT Core, enabling the necessary functionalities for the system. It uses the SSL certificates previously saved onto the Raspberry Pi to establish a secure connection. Jobs are enabled as the primary functionality, as that's how the printing instructions are received from the Lambda function.
A setup can be seen in the official example of a configuration file for the AWS IoT Device Client, available at this link. This allows you to explore a fully annotated configuration file, where each section's purpose is explained in detail.
{
  "endpoint": "abcdefghijkl-ats.iot.eu-west-1.amazonaws.com",
  "cert": "/opt/certs/greengadget_printer.public.crt",
  "key": "/opt/certs/greengadget_printer.private.key",
  "root-ca": "/opt/certs/root-CA.crt",
  "thing-name": "printer",
  "logging": {
    "enable-sdk-logging": true,
    "level": "DEBUG",
    "type": "STDOUT",
    "file": ""
  },
  "jobs": {
    "enabled": true,
    "handler-directory": ""
  },
  ...
}
With this setup, the device is ready to securely connect to AWS IoT and receive the Jobs containing the instructions to print the QR codes.
As a final detail, the print.sh shell script that the Job is instructed to run is exceptionally straightforward. Its function is to set the necessary parameters for the Brother printer, fetch the QR code image from the provided S3 URL, print it using the brother_ql command line tool, and finally remove the temporary file:
#!/bin/bash
export BROTHER_QL_MODEL=QL-500
export BROTHER_QL_PRINTER=file:///dev/usb/lp0
TMP_FILE=/tmp/file.png
aws s3 cp $1 $TMP_FILE
brother_ql print -l 38 $TMP_FILE
rm -f $TMP_FILE
The BROTHER_QL_MODEL and BROTHER_QL_PRINTER environment variables are set to specify the printer model and its connection interface respectively. Here, file:///dev/usb/lp0 represents a connection through the first USB printer device file in a Linux system.
With this script, the printing process becomes fully automated. Every time a new Job is created by the Lambda function, the device receives the Job, runs the script, fetches the correct QR code from S3, and prints it out. It's a seamless, hands-off process, right from the button press to the physical QR code label in hand.
BONUS Section: The Art of DIY
In addition to the technical details, there is an equally fun part of the project: DIY crafting! After all, for the event, I didn't want the button and its electronic board to be simply left unprotected on a table. It needed a touch of design, albeit delivered with a playful tone.
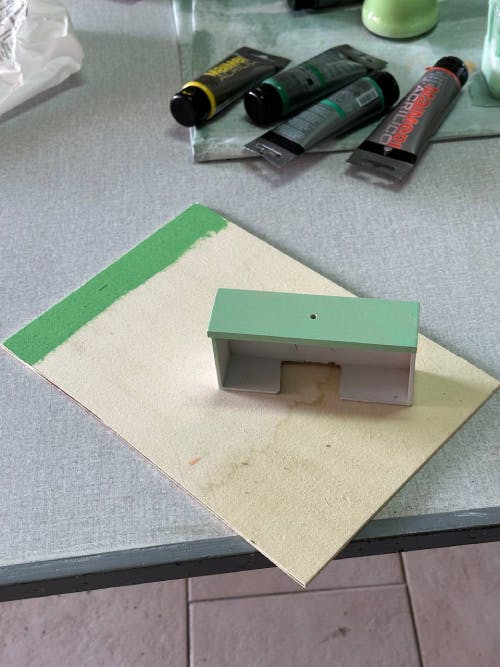
The idea was to construct a small box to house the electronic board, with a hole for the button to protrude through. 3D printing was the first idea that came to my mind; however, it soon dawned on me that producing a plastic object was at odds with our goal of sustainable gifting. It was then that I pivoted to a more eco-friendly material - wood. This choice added a touch of warmth and charm to the final product.

The box ended up with a drawer that can be opened to reveal the board:

All of this was painted with water-based paint:

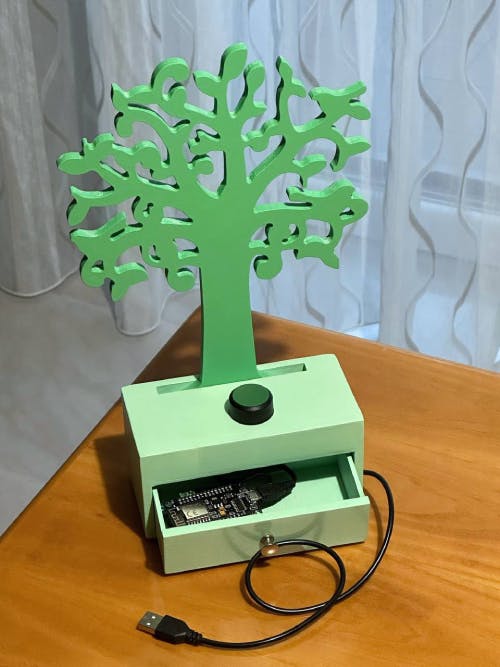
I carved out a pocket in the wood to fit in another piece of wood that symbolizes a stylized tree (that I owned before and just repainted accordingly).
This is the final result!

I'm not a pro at crafting but I had immense fun with this DIY part of the project; it's an incredibly rewarding work! Do you like it?
So, I'm happy to think that our job is not just about creating high-tech applications or services - it can also be a way to promote sustainability in creative and fun ways. I hope this journey at the crossroads of technology and the environment has inspired you as much as it did me. In the end, I transformed a simple button press into a real-world positive impact. And let me tell you, there's nothing quite like seeing your code come to life... and plant a tree! 🌱

